Be aware of default Nodebalancer throttle limits!
by Stefan Krantz
Throttling the number of requests through a load balancer is a common practice to ensure optimal performance and prevent overload on the backend systems. Here are a few reasons why throttling is necessary:
-
Resource Allocation: Load balancers distribute incoming traffic across multiple backend servers to ensure efficient utilization of resources. By limiting the number of requests, the load balancer can prevent any single server from becoming overwhelmed and maintain a balanced workload distribution.
-
Capacity Planning: Throttling requests allows for better capacity planning and prevents excessive resource consumption. By controlling the rate of incoming requests, administrators can ensure that the backend servers have enough resources (such as CPU, memory, disk I/O) to handle the workload without experiencing performance degradation or failure.
-
Avoiding DDoS Attacks: Distributed Denial of Service (DDoS) attacks aim to overwhelm a server or network infrastructure by flooding it with a large number of requests. Throttling can help mitigate the impact of such attacks by limiting the rate of incoming requests and preventing the target servers from being overwhelmed.
-
Preserving Service Level Agreements (SLAs): Many applications and services have defined SLAs that include response time guarantees or throughput limits. By implementing request throttling, load balancers can ensure that the SLAs are met by controlling the rate of incoming requests and managing the backend server’s capacity accordingly.
-
Protecting Backend Systems: Throttling can protect the backend systems from poorly designed or malicious clients that may send an excessive number of requests. By enforcing limits on the number of requests, load balancers can prevent abuse, limit the impact of potential bugs or inefficiencies, and improve overall system stability.
In summary, throttling the number of requests through a load balancer is a mechanism to regulate traffic flow, prevent overload, and protect the availability and performance of backend systems. It helps maintain a balanced workload, ensures resource availability, and safeguards against various potential issues, including DDoS attacks and abusive behavior.
In normal operations, the Linode Nodebalancer default throttle limit of 20 connections per second is acceptable. However, in certains situations this can cause a Denial Of Service in itself.
One of these situations is if the Noadbalancer is fronted by a CDN, such as Akamai. The reason for this is that when using a CDN many requests from end-users are concentrated down to only a few IPs that is requesting content through the Loadbalancer, so there is a much higher risk of actually hitting the throttle limits.
Easily fixed
This is easily remedied by setting the throttle limit to 0.
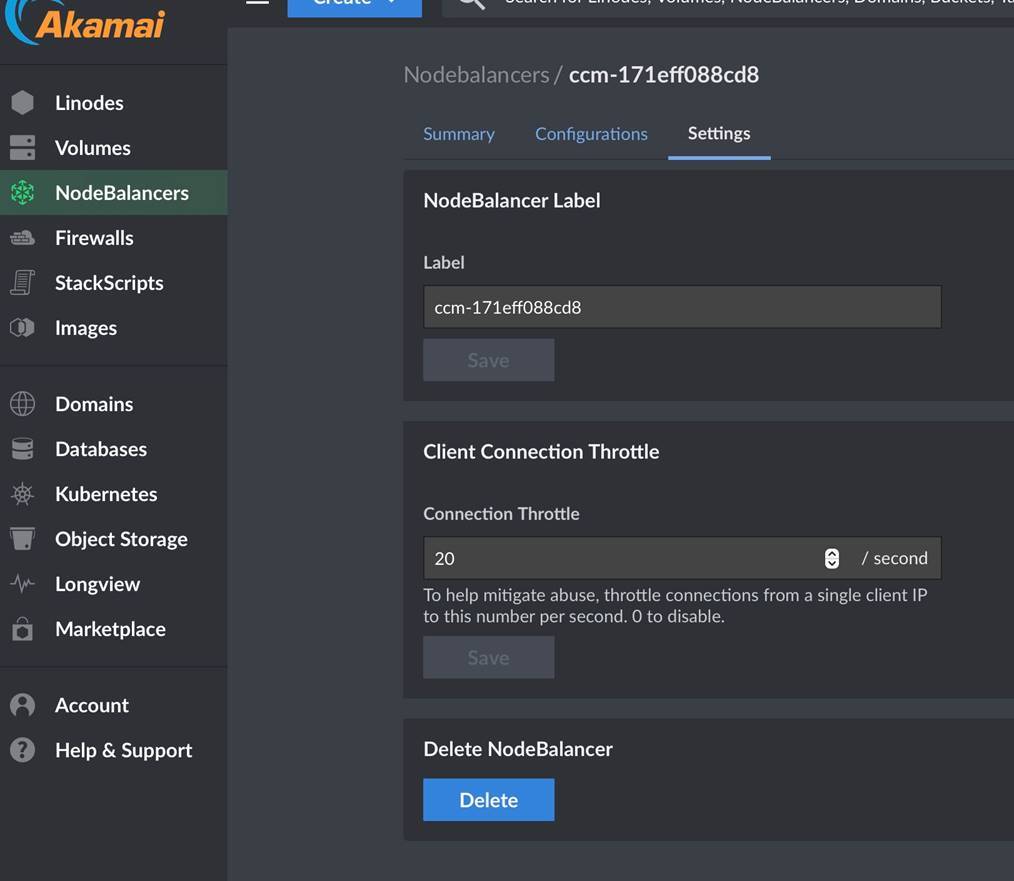
For manually deployed Node balancer you can use the UI to change the throttle limit to 0:
If this Nodebalancer is managed by Linode Kubernetes Engine (LKE) its configuration needs to be updated in the respective cluster, as it overrides any settings in the portal:
Look for kubernetes services with the type “LoadBalancer”
kubectl get svc
Add an annotatation to the Kubernetes Service that represents the loadbalancer with ‘service.beta.kubernetes.io/linode-loadbalancer-throttle: “0”’ Example
kind: Service
apiVersion: v1
metadata:
  name: https-lb
  annotations:
    service.beta.kubernetes.io/linode-loadbalancer-throttle: "0"
    service.beta.kubernetes.io/linode-loadbalancer-default-protocol: "http"
    service.beta.kubernetes.io/linode-loadbalancer-port-443: |
      {
        "tls-secret-name": "example-secret",
        "protocol": "https"
      }
spec:
  type: LoadBalancer
  selector:
    app: nginx-https-example
  ports:
    - name: http
      protocol: TCP
      port: 80
      targetPort: http
    - name: https
      protocol: TCP
      port: 443
      targetPort: https

---
apiVersion: apps/v1
kind: Deployment
metadata:
  name: nginx-https-deployment
spec:
  replicas: 2
  selector:
    matchLabels:
      app: nginx-https-example
  template:
    metadata:
      labels:
        app: nginx-https-example
    spec:
      containers:
      - name: nginx
        image: nginx
        ports:
          - name: http
            containerPort: 80
            protocol: TCP
          - name: https
            containerPort: 80
            protocol: TCP
More information and examples are available here
All The best! Stefan
tags: